Abrasive Polish vs. Non-Abrasive Burnishing: Choosing Cutting Grit or Steel Compression for Your Metal Parts
Manufacturing buyers searching for abrasive polish often treat "abrasive cutting" and "mirror burnishing" as the exact same step—assuming any polishing stone or steel ball inside a vibratory bowl can simultaneously grind away stamping burrs and produce a reflective mirror shine.
The central thesis of this guide is clear: abrasive polish (ceramic, plastic, and pumice grit) removes material through microscopic scratching to erase burrs, scale, and tool marks into a uniform matte finish, whereas non-abrasive burnishing (stainless steel balls, porcelain, and dry walnut/cob) compresses or wipes already-smooth peaks into bright mirror luster without cutting. Running abrasive grit when you want mirror shine leaves matte haze, while running non-abrasive burnishing balls on raw burrs leaves sharp edges intact. For related media comparisons, see our tumbler media guide, tumbling surface finish guide, and stainless steel tumbler media guide.
The Physical Divide: Material Removal vs. Peak Compression
Every mass finishing medium falls onto one side of a strict physical line: either it contains abrasive grit that shears metal away, or it is completely smooth and non-abrasive.
[DESIGN: Side-by-side microscopic comparison of abrasive ceramic grit shearing burrs vs smooth steel balls compressing surface peaks]
How Abrasive Polish Media Cuts Away Burrs and Scratches
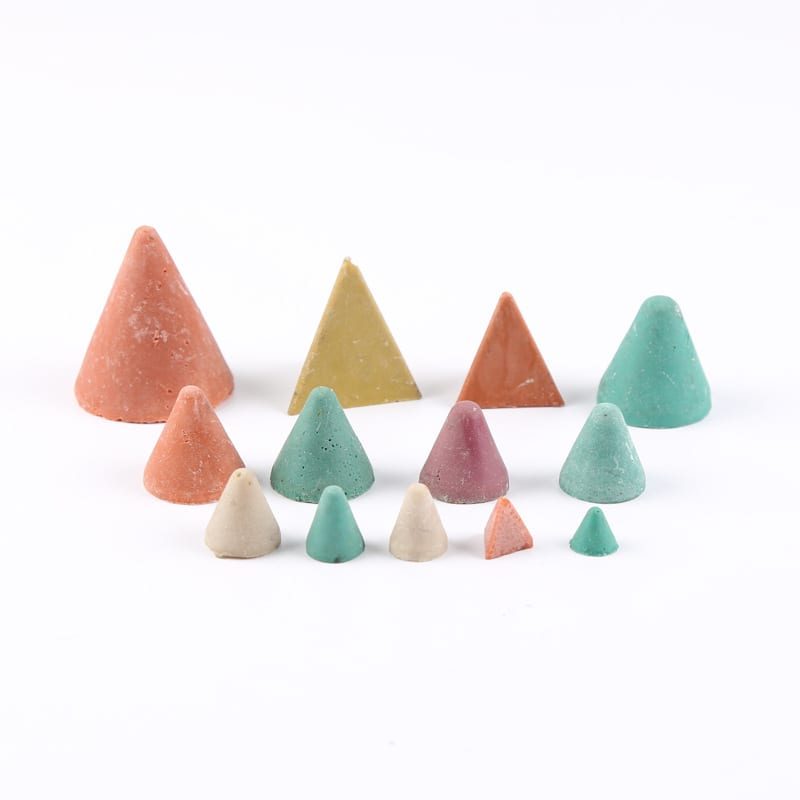
Preformed ceramic triangles, resin-bonded plastic cones, and pumice-charged wood pegs embed hard mineral grains (aluminum oxide, silicon carbide, quartz) inside a ceramic or resin matrix. As parts tumble inside wet LC10 or MC8 solution, thousands of sharp mineral points shave off rollover burrs, strip oxide scale, and level directional CNC tool ridges into a uniform matte satin finish.
How Non-Abrasive Burnishing Creates Mirror Reflectivity
Smooth hardened 304 stainless steel balls, high-alumina porcelain spheres, and dry cream-charged walnut shell granules contain zero coarse cutting grit. Instead of removing metal chips, they glide under lubricating PL10 compound to plastically compress and wipe surface peaks flat—creating dense, reflective mirror clarity.
Why "All-in-One Abrasive Mirror Polish" Fails on Shop Floors
Because cutting grit leaves micro-scratches while smooth burnishers cannot shear heavy burrs, no single medium can erase rough CNC tool tracks and leave a deep mirror shine in one step. High-gloss production lines always separate Stage 1 abrasive polish cutting from Stage 2 non-abrasive burnishing.
| Process Mechanism | Typical Media | Compound Chemistry | Removes Burrs & Scale? | Final Surface Appearance |
|---|---|---|---|---|
Abrasive Cutting (Heavy) |
Preformed ceramic triangles / cylinders | Wet LC10 / MC8 flow-through |
Yes (fast burr & scale removal) | Uniform matte satin |
Abrasive Cutting (Soft Alloy) |
Resin-bonded plastic cones / pyramids | Neutral LC10 / JTS5 flow-through |
Light burrs & CNC cusps | Silky fine pre-anodize matte |
| Non-Abrasive Plateauing | Smooth high-alumina porcelain spheres | Steel conversion or neutral LC10 |
No (wipes peak tips only) | Low-Ra satin-to-bright plateau |
| Non-Abrasive Burnishing | 304 steel balls / cones or dry walnut/cob |
Wet PL10 or dry cream |
No (compresses peaks flat) | Dense reflective mirror gloss |
[DESIGN: Four-tier visual matrix linking heavy ceramic cut, soft plastic cut, porcelain plateau, and steel-ball mirror burnish]
Selecting Abrasive Polish Media by Alloy Hardness and Defect Depth
Choosing the right abrasive bond (ceramic vs. resin plastic vs. pumice) prevents over-cutting soft aluminum or stalling on hardened steel.
Preformed Ceramic Media for Steel, Stainless, and Titanium
Dense aluminum-oxide ceramic triangles and angle-cut cylinders carry the mass needed to shear tough stamping burrs, strip laser oxide dross with MC8, and round 90-degree edges on carbon steel, 304 stainless, and titanium alloys.
Resin-Bonded Plastic Media for 6061 Aluminum, Brass, and Zinc
Dropping heavy ceramic stones onto 6061 aluminum brackets or Zamak die castings bruises flat faces and leaves rough gray pitting. Lightweight resin-bonded plastic cones cushion soft alloys while erasing CNC ball-mill cusps cleanly under neutral LC10 or JTS5 flow-through.
Dry Pumice and Wood/Bamboo Pegs for Acrylic and Eyewear
For PMMA acrylic edges and cellulose acetate eyewear frames, fine pumice powder paired with hardwood pegs inside dry rotary barrels delivers controlled abrasive polish leveling without wet slurry or solvent crazing.
Transitioning Cleanly From Abrasive Cut to Mirror Burnishing
The boundary between Stage 1 cutting and Stage 2 burnishing is where most finish defects happen.
[DESIGN: Two-stage line diagram showing Stage 1 ceramic cut bowl, clean flush screen, Stage 2 PL10 burnish bowl, and heated dryer]
Never Leave Rough Scratches Un-Leveled Before Burnishing
Inspect parts after Stage 1 abrasive cutting under bright angled light. If a faint stamping draw line or CNC milling track remains visible in the matte surface, steel burnishing balls will merely shine the bottom of the groove rather than erasing it.
Purging Stray Abrasive Grit Before Stage 2 Burnishing
A single broken ceramic chip carried inside a hollow flange into a 304 stainless steel burnishing bowl scores fresh matte scratches across every mirror part in the batch. Keep cutting and burnishing in physically separated chambers and rinse transfer baskets thoroughly.
Using Heated Corncob Drying to Lock In Mirror Clarity
After wet PL10 burnishing, flush parts with clean softened water and drop them straight into a heated corncob media dryer or centrifugal dryer so hard-water mineral rings never form on mirror faces.
Equipment Platforms for Abrasive Polish and Burnishing Lines
Chamber motion governs cycle speed, collision safety, and internal bore reach.
Circular Vibratory Bowls for Continuous Flow-Through Cutting & Burnishing
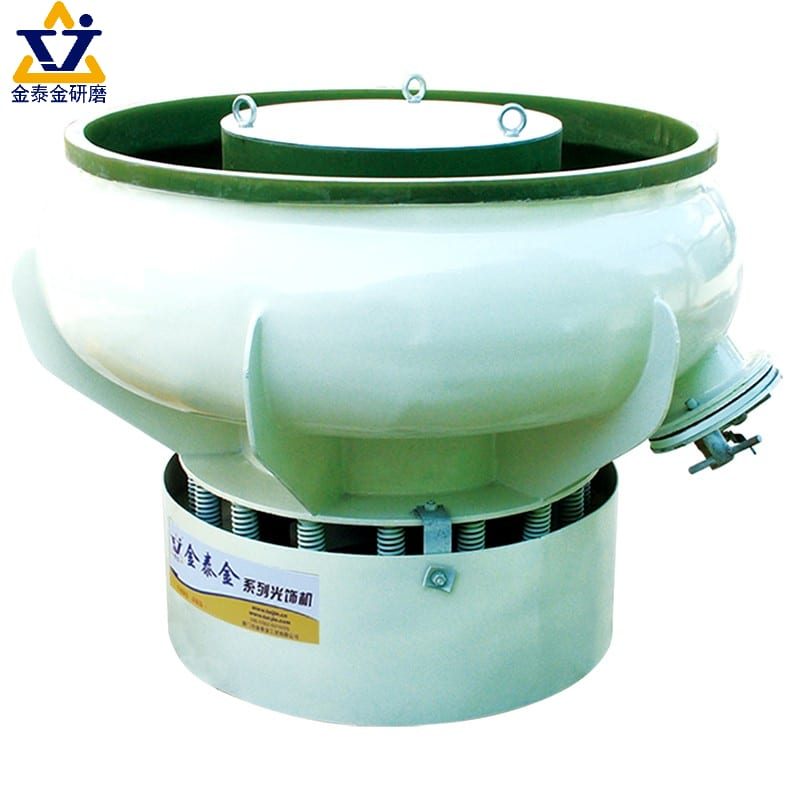
PU-lined vibratory grinders with pneumatic separation flaps handle both Stage 1 LC10 ceramic cutting and Stage 2 PL10 steel ball burnishing cleanly—flushing spent abrasive mud continuously out of the drain screen.
Divided Rectangular Troughs and Fixtured Drag Finishers for Zero Collision
Long rails, heavy connecting rods, and precision sequential gears collide violently in open bowls. Divided troughs isolate one part per polyurethane bay, while drag finishers clamp each part on a rotating spindle for rapid zero-nick smoothing.
Centrifugal Disc Finishers for Rapid Compact Cutting
Centrifugal disc finishers accelerate abrasive cutting cycles sharply on compact, rigid parts via high-pressure toroidal vortex flow.
Wide-Table OBD Magnetic Tumblers for Internal Cross-Bores
Where deep cross-drilled holes or tight cooling fins block larger stones on non-ferrous and 304 stainless parts, translating OBD magnetic tumblers sweep fine 304 stainless pins magnetically through internal bores.
| Equipment Platform | Best Role in Abrasive / Burnish Flow | Collision Protection | Key Limitation |
|---|---|---|---|
| Circular Vibratory Bowl | Daily batch cutting & PL10 burnishing |
Medium (media-cushioned) | Long parts bridge channel |
| Divided Rectangular Trough | Zero-collision heavy or long part finishing | Maximum (1 part per bay) | Manual/hoist bay unload |
| Fixtured Drag Finisher | High-speed precision low-Ra & mirror | Maximum (spindle-clamped) | Requires part-specific fixtures |
| Centrifugal Disc Finisher | Fast heavy abrasive cut on compact parts | Low-Medium (rigid parts only) | Dents thin/fragile stampings |
| Octagonal Rotary Barrel | Quiet batch cutting & dry organic gloss | Medium (wet) / Low (dry) | Slower cycles; closed drum |
[DESIGN: Platform selection matrix matching part fragility, batch size, and abrasive vs burnish stage across five machines]
Compound Chemistry: Keeping Abrasive Stones Sharp and Burnishers Slick
Compounds serve completely opposite jobs in abrasive cutting versus non-abrasive burnishing.

LC10 and MC8 Keep Abrasive Pores Open and Strip Scale
During abrasive cutting, LC10 suspends fine metallic and ceramic wear debris in clean drain flow so abrasive stone faces stay sharp rather than glazing smooth—while MC8 breaks down brittle mill scale and weld oxide ahead of cutting.
PL10 Cushions Steel Burnishing Balls Against Orange-Peel Dimpling
During non-abrasive burnishing, PL10 creates a high-lubricity foam cushion that keeps dense 304 stainless balls gliding smoothly across metal peaks without hammering wavy "orange peel" craters into thin sheet stampings.
JTS5 and JTJ50 Protect Soft Aluminum and Bare Carbon Steel
Neutral JTS5 prevents dark high-pH etching on 6061/7075 aluminum during plastic-cone cutting, whereas JTJ50 rust inhibition stops freshly abraded carbon steel from flashing orange rust between unload and heated drying.
Common Failure Modes When Mixing Up Abrasive Polish and Burnishing
These four shop mistakes account for most rejected finishing batches.
[DESIGN: Troubleshooting gallery showing glazed ceramic stones, bright un-removed burrs, orange-peel dimpling, and stray-grit scratches]
Shiny Burrs Left Intact From Skipping Abrasive Stage 1
Loading raw stamped parts directly into stainless steel burnishing balls polishes sharp rollover burrs bright without removing them. Always deburr first with ceramic or plastic media.
Glazed Abrasive Stones From Closed-Tank Oil Carryover
Dumping oily CNC parts into a closed recirculating sump coats ceramic pores with dark grease, collapsing cutting speed halfway through the shift. Pre-degrease oily parts and maintain steady fresh-water LC10 flow-through.
Endless Ceramic Tumbling Chasing a Mirror Finish
Leaving parts running indefinitely in abrasive ceramic media never produces mirror gloss—it only wears away edges and keeps renewing a matte cut. Switch to non-abrasive steel balls, porcelain, or dry walnut/cob once rough marks disappear.
Orange-Peel Bruising From Heavy Steel Balls on Soft Aluminum
Never drop dense stainless steel balls onto soft aluminum housings; smooth aluminum with lightweight resin-bonded plastic cones followed by clean high-alumina porcelain spheres.
Skipping Heated Drying After Wet Burnishing
Leaving freshly burnished stainless steel or brass sitting damp in wire baskets lets hard rinse water evaporate slowly into milky mineral rings—wiping out the clarity achieved during Stage 2 compression. Always pair wet burnishing with softened water rinsing and immediate heated centrifugal or corncob drying.

Honest Boundaries: What We Do and Do Not Supply
At Xiamen Jin Tai Jin Grinding Technology Co.,Ltd. (brand: Jings Polish), our workshop roots date back to 1996 and our company was formally established in 2009, delivering over 200,000+ sets of grinding and polishing solutions worldwide. Across our catalogue, we manufacture 21 machine platforms backed by 24 granted Chinese IP rights (1 invention patent, 15 utility model patents, and 8 design patents), under ISO 9001 certification 00726Q01571R001 (valid 2026-06-03 to 2029-06-02) and CE certifications M.2023.206.C88121 (Vertical, 8 models) and M.2023.206.C88120 (Horizontal, 13 models), valid until 2028-07-24.
Equipment, Media, and Compounds—Not Hand-Held Buffers or Contract Finishing
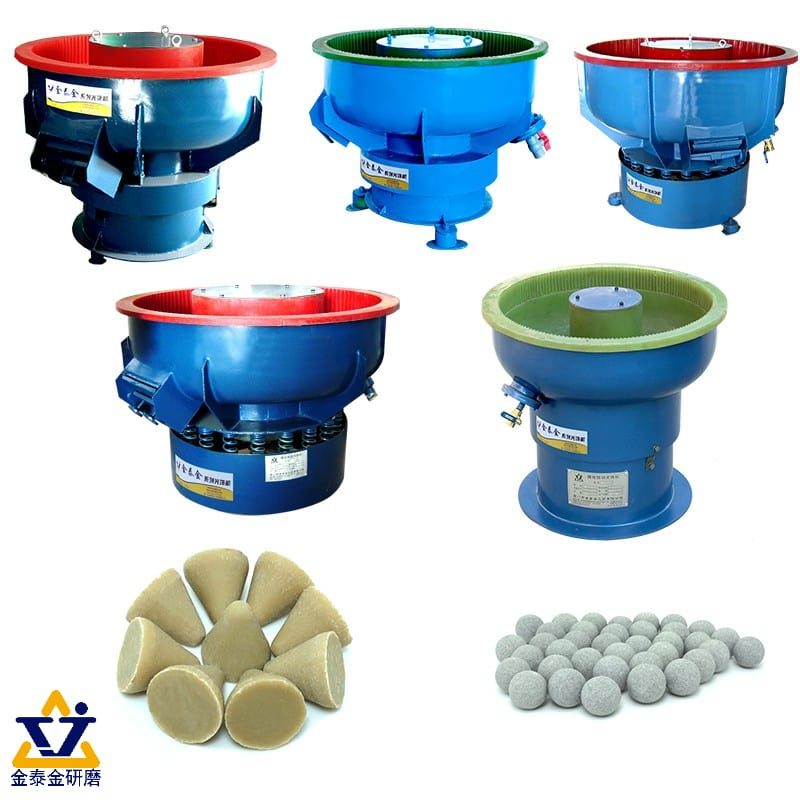
We manufacture and supply vibratory bowls, divided troughs, drag finishers, centrifugal disc finishers, octagonal rotary barrels, OBD magnetic tumblers, heated dryers, abrasive ceramic/plastic/pumice media, non-abrasive porcelain/304 steel/organic media, and finishing compounds. We do not supply hand-held angle grinders, flap wheels, pedestal cloth-wheel buffing lathes, dry sandblasting cabinets, electroplating baths, or contract job-shop polishing services. Standard machines ship in 25–35 days, while custom lines require 45–60 days.
Engineering Assessment Before Recommending Media & Chambers
Because alloy grade, starting burr/scratch depth, narrowest hole/slot width, and target finish (matte vs. mirror) govern Stage 1 and Stage 2 setup, we do not promise free mail-in sample trials or guarantee cycle times before inspecting your workpiece—send clear photos of your raw and target finish via our custom polishing solution page for an engineering assessment.
Buyer Checklist & FAQ for Abrasive Polish vs. Burnishing
Review these practical benchmarks when specifying a mass finishing line.
[DESIGN: Annotated abrasive vs burnish enquiry checklist showing alloy, starting burr/scratch depth, slot size, and target gloss]
Can resin-bonded plastic media produce a mirror polish on brass or stainless steel?
No—even fine resin-bonded plastic cones are mildly abrasive and leave a smooth satin-matte pre-polish finish. To reach mirror reflectivity, follow plastic or ceramic cutting with non-abrasive 304 steel ball burnishing (PL10) or dry cream-charged walnut shell tumbling.
How do I know when Stage 1 abrasive polish cutting is complete and ready for Stage 2 burnishing?
Rinse and dry a sample part and inspect it under angled task lighting: every stamping draw mark, CNC milling scallop, and sharp burr must be replaced by a uniform, non-directional matte surface before moving to non-abrasive burnishing.
Does non-abrasive porcelain media wear down as fast as abrasive ceramic triangles?
No—high-alumina porcelain contains zero coarse cutting grit and wears very slowly, making it economical for long-term isotropic plateauing and gentle aluminum brightening once Stage 1 cutting is complete.
Why did my 304 stainless parts turn dull gray during steel ball burnishing?
Either oily parts contaminated the PL10 solution, or spent dirty water was recirculated indefinitely. Pre-degrease parts cleanly, flush the steel ball charge in hot water with fresh PL10, and rinse finished parts with softened water before heated drying.
Can an OBD magnetic tumbler with 304 stainless pins handle both light deburring and bright burnishing?
Yes, on non-ferrous alloys (brass, copper, aluminum) and non-magnetic 304 stainless steel. High-speed magnetic rotation drives fine 304 pins through tight cross-holes to strip feather burrs while burnishing internal crevices bright—though heavy stamping burrs and deep CNC milling cusps still require Stage 1 ceramic or plastic cutting in a vibratory bowl or centrifugal disc first.
Why do thin sheet-metal brackets warp or dent when switching to heavy steel burnishing balls?
Heavy stainless steel balls carry roughly three times the density of resin-bonded plastic cones and significantly more mass than standard ceramic triangles. Overloading thin stampings with undersized PL10 water cushion lets heavy balls hammer delicate ribs—so always keep PL10 water buoyant, step down ball size, or switch soft thin brackets to high-alumina porcelain spheres.
How does dry walnut-shell and corncob tumbling fit into the abrasive-vs-burnishing spectrum?
Dry walnut shell media and dry hardwood pegs charged with fine polishing creams act as gentle, ultra-fine micro-burnishers for brass, gold, eyewear, and acrylic edges—whereas clean un-oiled corncob media inside a heated vibratory bowl serves as the final moisture-wicking and residue-buffing step after wet steel burnishing.
Can one vibratory bowl run Stage 1 abrasive cutting and Stage 2 non-abrasive burnishing?
Physically possible if the drive motor and suspension springs are rated for dense steel shot, yet swapping heavy media charges daily wastes shift hours and risks stray Stage 1 ceramic grit scratching Stage 2 mirror parts. High-volume plants run dedicated Stage 1 and Stage 2 chambers side by side.
How do I prevent abrasive ceramic media from lodging inside mounting holes during Stage 1 cutting?
Compare the shortest cross-section of candidate ceramic triangles or angle-cut cylinders against every slot, louver, and hole on your drawing—choosing shapes comfortably larger than every opening or small enough to pass straight through, and screen out worn undersized fragments regularly.
When should a fabrication shop choose fixtured drag finishing over bulk vibratory burnishing?
Bulk vibratory burnishing works cleanly for sturdy stamped hardware and cutlery that tolerate cushioned contact, whereas high-value precision CNC parts—such as billet impellers, sequential transmission gears, and orthopedic implants—cannot risk even a single edge nick. Fixtured drag finishers clamp each workpiece on a planetary spindle so parts sweep rapidly through stationary plastic or porcelain media with zero part-on-part collision.
Why do carbon-steel brackets sometimes flash-rust right after leaving a wet ceramic cutting bowl?
Freshly abraded carbon steel exposes clean, chemically active bare iron the instant mill scale and rolling oil come off. Leaving wet steel sitting in holding baskets without rust-inhibiting JTJ50 rinse protection and immediate heated centrifugal spin-drying produces orange surface rust before the shift ends.
Can stainless steel burnishing balls brighten brass and copper valve bodies without tarnish?
Yes, provided you pre-clean oily machining residue first, keep PL10 compound strictly neutral and free of ammonia brighteners that stress-crack brass, rinse finished valves immediately with clean softened water, and dry them straight inside a heated centrifugal or corncob dryer.
How does media-to-part volume ratio change both abrasive cutting speed and burnishing gloss?
Cramming extra parts into a bowl to save cycle time starves the protective media cushion between parts—causing violent edge denting and uneven patchy cutting. Keeping a generous media ratio ensures every surface receives uniform abrasive shear in Stage 1 and uniform cushioned compression in Stage 2.
What wastewater setup is needed when running Stage 1 ceramic cutting alongside Stage 2 steel burnishing?
Route the Stage 1 ceramic cutting bowl's drain hose through a simple multi-baffle settling tank to trap heavy abrasive grit and metallic fines before discharge, whereas the Stage 2 304 steel burnishing bowl discharges clean PL10 soap water with negligible solid sediment.
Can centrifugal disc finishers run both abrasive cutting media and steel burnishing balls?
Centrifugal disc machines excel at rapid high-energy abrasive cutting with ceramic or plastic media on compact rigid parts. When running dense steel burnishing shot, however, wide-channel circular vibratory bowls or heavy-duty octagonal rotary barrels generally provide gentler buoyant PL10 cushioning and cleaner screen separation without excessive impact dimpling.
How do I know when worn ceramic triangles should be screened out and replaced?
Check ceramic dimensions against your part's narrowest mounting holes and cooling slots weekly, and watch for noticeably longer cycle times to reach uniform matte finish. Screening out undersized worn fragments prevents slot jamming and restores crisp Stage 1 cutting speed immediately upon topping up with fresh triangles.
Can non-abrasive steel burnishing balls remove light heat tint or surface oxidation on stainless steel?
Light atmospheric dullness wipes off cleanly under PL10 burnishing lubrication, yet dark straw-blue TIG weld heat tint and thick furnace oxide scale resist smooth steel shot completely. Always strip heat tint and oxide scale first using Stage 1 ceramic cutting paired with MC8 descaling compound before transferring clean parts into burnishing.
What details should I share before requesting a quote for abrasive or burnishing equipment?
Send clear photos of your raw parts and desired finish, alloy grade, part envelope dimensions and weight, narrowest slot or hole size, and hourly batch target via our custom polishing solution page. Also note whether oily machining residue or laser oxide scale is present before loading, and whether downstream anodizing, plating, or packaging follows. Our engineers will size the exact Stage 1 cutting and Stage 2 burnishing chambers, non-lodging ceramic, plastic, porcelain, or 304 steel media grades, heated drying equipment, and LC10/MC8/PL10 compounds tailored reliably to your shop floor and daily production output to eliminate manual buffing, glazed stones, and rejected batches permanently.

 +86-592-2381506


 IPv6 network supported